Foot Measuring Method for Gaelic Shoes and Gaelic Boots
The following instructions are to be used while wearing the same weight socks that you intend to wear with your new footwear. Medium weight socks are suggested. When you have made the 3 measurements for each foot - please post these two pages to -
celticshoes.ie c/o Con Connor Candlefield Castlerea Co Roscommon f45hk53 Ireland.
You will need – an assistant, (a gift for your assistant too), at least two A4 pages, a sharp pencil, a cloth tape and to read these instructions more than once with your assistant. Accurate measurements by you are essential for me to make footwear that fits you comfortably.
Step 1.
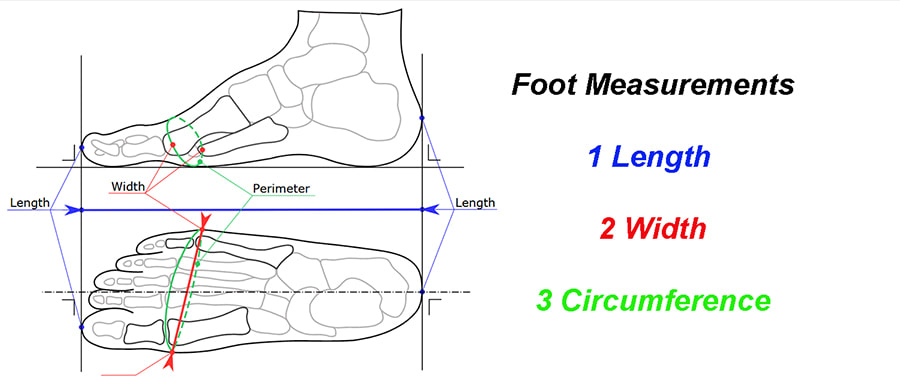
For each foot - put a separate sheet of A4 paper on the floor and be sure it touches the wall evenly. Your name, email and postal address and date should be written on each page after the measuring is done. You will stand to let the foot make its usual full floor contact - put your foot with sock on the page with the heel touching the wall. Do not push back - just have your heel touch the wall. Lift your toes and spread them and settle the toes on the page.
Now have your assistant hold the pencil in the vertical plane and while touching the longest toe make a left right mark (blue dot in the graphic) on the paper. This gives the true length of the foot with sock.
Step 2.
Have your assistant draw a line around the outside edge of the foot. The part of the paper near the wall that the heel touches cannot be properly drawn on – so just go as close as possible – always keeping the pencil in the vertical.
Now have your assistant find the hinge point (red line in the graphic) this is a line from where the big toe hinges to where the little toe hinges. This is the widest part of the foot. Mark both ends of this widest point with arrows on each side. This will give two measurements - the correct width and location of this correct width.
Step 3.
Next, ask your assistant to use the cloth tape to measure the circumference (green circle in the graphic) of your foot at the hinge point marked by the red arrows at the exact widest mark. Lift the front of the foot and slide the tape under until the tape is over the two arrows of the widest hinge point. The cloth tape should not be pulled tight, it should not be too loose either – best method is to find tight and then loose and to then find in between these two measurements will be 'just right'. The difference between too tight and too loose is approx 10mm.
Repeat the above for the other foot.
Note 1.
For each foot – once measuring begins do not remove your foot from the page. The pencil must be kept vertical at all times to avoid recording fake measurements. Measurements can be in inches or millimetres – if you cannot decide or determine the number – take photographs that shows the tape loose and tight and just right. Send these images to [email protected] with your name, date etc. I will make all the necessary allowances from these measurement to craft shoes or boots to fit you – so make sure these guidelines are precisely followed.
Note 2.
This is the technique I use when I am measuring the feet of visitors to see if 'off the shelf' / 'ready made' are suitable. If there are large differences between each foot as often happens, it may be that a set of bespoke foot lasts will need to be made using your measurements. It sometimes happens that one foot can be much longer than the other foot which may actually be much wider at the hinge point. Getting these measurements lets us know if such a decision is required – getting footwear deliberately made that really fits you gives you better posture and real comfort thereby reducing tiredness. If a pair of foot lasts for a bespoke design are required to give a proper comfort fit – I will contact you before creating them as there is an extra cost involved for this extra work.
Please adhere closely to the instructions given above and if you are unsure that you have got true measurements – simply repeat the measuring process with greater care. I will keep your measurement details private and on record for further possible use in the future. If a pair of foot lasts are created for you I will put your name on them and keep them private and on record for further possible use in the future.